
As an Amazon Associate I earn from qualifying purchases. This article contains affiliate links that may earn a commission at no extra cost to you.
If your ATV is hard to start, idles rough, or bogs when you grab the throttle, a dirty carburetor is the most likely culprit. It is the single most common failure on a machine that has sat for a season, and it is also one of the cheapest and easiest to fix. A full clean takes an afternoon, costs a few dollars in cleaner and a gasket kit, and cures the problem for years if you do it right.
Here is the step-by-step method I use, the parts that actually wear, and the tools that make the job come out clean the first time.
Carbureted ATVs cover a lot of ground. The small Japanese machines, from the Yamaha Rhino 450 to the Can-Am Outlander 450, all run on the same basic idea: a float bowl feeds fuel to tiny jets, a slide opens to let air in, and a needle meters the mix.
When those jets clog and the needle sticks, the engine starves. If you have a machine like the CFMoto CForce 800 or the Linhai Bighorn 28, the same process applies even when the exterior plastic differs.
Why an ATV Carburetor Gets Dirty in the First Place
Most of the time the problem is fuel, not a bad carburetor. Modern gasoline with ethanol, the E10 fuel sold at most pumps, loves to absorb water and it varnishes when it sits. Leave a tank full of E10 in a machine over the winter and the lighter fractions evaporate, leaving a gummy film that plugs the jets and sticks the float needle.
The pilot jet, which is the smallest orifice in the carb, is the first to clog, and a plugged pilot jet shows up as a hard start and a rough idle long before the machine stops running under throttle.
Dirt and water from the tank and fuel lines make it worse. A rusty tank, a cracked fuel line, or a clogged fuel filter all feed contaminants into the bowl. That is why the clean is only half the job; the other half is fixing the source so the carb does not re-clog next season.
How to Tell It Is the Carburetor and Not Something Else
Before you pull a carburetor, rule out the cheap easy checks so you are not doing the wrong job. Confirm there is spark by testing the plug, confirm the battery is strong enough to spin the engine, and confirm fresh fuel is reaching the bowl. If it fires on starting fluid but will not run on its own, the carb is almost certainly the problem. If it has spark and fuel but still will not start, look at the carb before you suspect the engine itself.
The classic symptoms are all in the idle and the tip-in. A machine that starts after much cranking, dies when cold, sputters when you roll the throttle on, or idles so low it stalls at a stop is a carburetor that needs attention. Black smoke from the pipe points at a stuck float drowning the engine in fuel, which is another carb symptom plain and simple.
What You Need Before You Start
A bathroom to keep the job safe and fast. You want an aerosol carburetor cleaner, a drip-style carburetor cleaner or soak for the metal parts, a small parts cleaner brush set, and a can of compressed air to blow out the tiny orifices. Add a replacement gasket and O-ring kit for your model, a new fuel filter, and a small clean catch pan.
Most older quads do not need special tools, just a screwdriver set, a small socket set, and a pair of needlenose pliers.
Do not skip the compressed air. Spraying cleaner at a jet is not enough; a plugged pilot jet needs the air to actually push the varnish out of the tiny hole. If you do not own air, most shop compressors work, and a can of compressed air for electronics covers the job on most single-cylinder quads. Keep a carburetor cleaning kit with jet brushes in the box so you are not improvising.
Step 1: Remove the Carburetor
Start by draining the fuel from the tank or closing the shutoff valve so you are not pouring gas all over the engine. On most ATVs the carburetor lives under the tank or behind the plastics, and you get to it by lifting the seat and the tank or by removing a side panel. Loosen the hose clamps on the rubber intake boot, the one between the airbox and the carb and the one on the engine side, and work the carb out of the boots.
Take a photo of the cables and fuel line before you disconnect anything. On a single-cylinder ATV there is usually a throttle cable and a choke cable. Slide the cable ends out of their seats and disconnect the fuel line, then lift the carb clear. Set it on a clean bench with a towel underneath.
Step 2: Drain and Disassemble the Float Bowl
Turn the carburetor over and you will see the float bowl, the metal cup on the bottom held on by two or four small screws or bolts. Loosen them and work the bowl off, keeping the screws safe. Inside you will see the float, which is normally brass or plastic, and the float valve, the little tapered needle that the float pushes to close off fuel flow. Lift the float off its pivot pin and set it aside.
When the bowl is off, drain any old fuel from it into your catch pan. Inspect the fuel in the bowl; if it looks watery, smells of varnish, or has sediment in the bottom, that is your answer. The bowl holds the dirt that is clogging the jets, and seeing it confirms the diagnosis before you touch a jet.
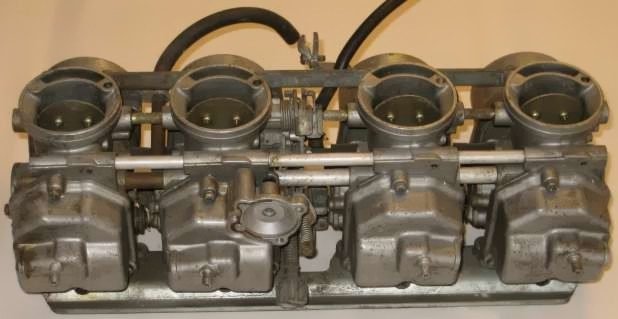
Step 3: Clean the Jets and the Small Passages
The main jet and the pilot jet are the two brass components that meter the fuel, and they are the parts that clog. The main jet sits in the mouth of the venturi or the emulsion tube, and the pilot jet is the smaller fitting nearby. With the right-size jet tool or a screwdriver that fits the slot, unscrew them gently and set them aside.
Spray the jets with carburetor cleaner, then blow them out with compressed air from both ends. When you can hold a jet up to the light and see straight through the center hole, it is clean. Do not ream the jets with a wire or a paperclip; the orifice is precisely sized, and a blade of wire widens it and ruins the mixture. Cleaner and air are the only two things that should pass through a jet.
Blow out the emulsion tube and the tiny air bleeds around the venturi with the same cleaner and air, then clean the needle and the needle seat on the carb body. A stuck needle that will not move in its seat is a classic hard-start cause, and a little lube on the slide or the needle tip frees it up.
Step 4: Soak and Rinse the Body
For a carburetor that has sat a long time, a quick spray is not always enough. Submerge the metal carburetor body and the jets in a drip-style carburetor cleaner and let them soak for several hours or overnight. The drip-style cleaners work over time and dissolve the heaviest varnish. Keep the plastic parts, the float, and the rubber O-rings out of the soak, because the cleaner attacks them.
After the soak, rinse the body in warm water and blow every passage out with compressed air again. Hold it up to the light and confirm each tiny passage is clear before you reassemble. This soak step is what separates a temporary fix from a clean that lasts.
Step 5: Replace the Gaskets and Reassemble
Reinstall the jets with the exact torque they came out with, which is just snug for brass jets, and mount the float back on its pivot. Set the float height to spec if your service manual gives it, because a mis-set float either floods the bowl or starves it. Install the fresh gasket on the carb body, clean the float bowl, and refit the bowl, snugging the screws in a cross pattern so it seats evenly.
When you refit the carburetor, replace the fuel line and the air filter if they are worn, and fit a fresh in-line fuel filter if yours does not have one. This is the source-fix part of the job. If you put a clean carburetor on a tank full of old fuel with a torn filter, you will be doing this again in a month.
Step 6: Reinstall, Prime, and Tune the Idle
Slide the carburetor back into the intake boots, seat the rubber rings properly, and reconnect the throttle and choke cables. Tighten the hose clamps and reconnect the fuel line with the fuel turned off, then turn the fuel on and check for leaks at the bowl and the lines before you start the engine.
Start the machine and let it warm to operating temperature. Adjust the idle screw so the engine idles steady without stalling, and if your manual specifies it, set the air fuel mixture screw to the baseline. Take it for a short ride and confirm it pulls clean from a stop, then recheck the idle when it is warm. A freshly cleaned carburetor usually runs rich and smoky for the first minute until the new fuel cleans it out, then settles.
Do You Need to Deep-Clean, or Will Additive Work?
For a machine that has only sat a few weeks, a fuel system cleaner added to the tank can often revive a slightly sticky carburetor without pulling it apart. It is worth trying first because it is a ten-minute job. But once the carb has varnished or the pilot jet has plugged solid, additives alone will not fix it. A tank full of seafoam cannot push varnish out of a jet that is completely stopped.
When in doubt, pull the carb and do the real clean, because you will end up there anyway.
How to Stop It Happening Again
The cheapest insurance is non-ethanol gas and a stabilizer. If you can get ethanol-free fuel in your area, use it in the ATV. If you cannot, drain the bowl before any long storage and add a fuel stabilizer to the tank. For winter, the ideal habit is to run the machine briefly with stabilized fuel, then shut it off and drain the float bowl, so no old gas sits in the carb.
Add a good synthetic ATV oil for the next change and keep fuel stabilizer on the shelf, and the carburetor stays clean between seasons. It is the same routine that keeps the older machines on this site reliable, and it is the difference between a first-pull start and a Saturday spent cleaning jets.
Images used under the Creative Commons license. Featured photo of the SYM Quadlander by the Wikimedia contributor; carburetor photo from Wikimedia Commons. Both reproduced from freely licensed sources for reference only; no manufacturer endorsement.
atv carburetor cleaner kit
Owners of this machine rave about it. See today’s price on Amazon.
Bottom Line
Cleaning an ATV carburetor is one of the most useful skills you can have, because it fixes the most common problem a used quad develops and it costs almost nothing. Remove the carb, clean every jet with cleaner and compressed air, soak the body if it is badly gummed, replace the gaskets, and fix the fuel source on the way back. In an afternoon you take a hard-starting, rough-idling quad and make it run like it should.
It beats paying a shop, and it means the machine is ready when you are.

