
As an Amazon Associate I earn from qualifying purchases. This article contains affiliate links that may earn a commission at no extra cost to you.
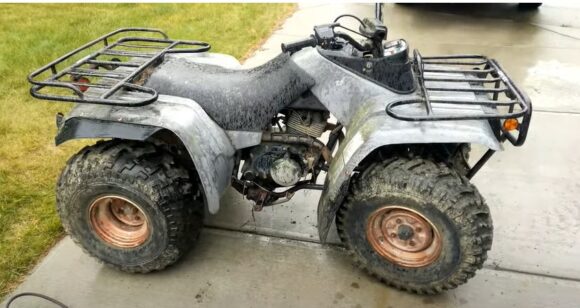
The Yamaha Moto-4 was the workhorse of the mid-1980s ATV boom, a family of air-cooled four-stroke singles built in displacements from 80cc up to 350cc and sold from about 1985 into the early 1990s. The machines are still everywhere, and owners still ride them hard. The failures that show up after decades of service are remarkably consistent: gummed-up carburetors, no-start electrical faults, free-spinning starter clutches, sub-transmissions that slip or pop out of gear. This guide covers those problems in the order owners actually run into them, with the fixes that have worked in the field. If you own a Moto-4 or you’re shopping for one, this is the short list of what to inspect first.
Carburetor and fuel delivery fail first
If a Moto-4 has been sitting, the carburetor is the first place to look. The most common complaint in owner threads is an engine that only runs on choke, or one that idles fine but bogs and dies the moment you crack the throttle. Owners dug into exactly this on a 1986 Moto-4 200 after a fresh carb rebuild: the tiny holes in the pilot jet had been missed on the first cleaning pass, and once they were open the machine idled without choke. Another 1986 225 owner soaked his carb three times before it would run without choke, and a 350 owner had to deal with a main jet that had frozen into the body.
The fuel path on these bikes is short: tank, petcock, line, carb. A 1989 Moto-4 250 that refused to start even with a rebuilt carb and fresh gas turned out to have a clogged vent tube on the float bowl, so the bowl never filled; the owner cleared it with a piece of wire and the machine started immediately. That is why the standard advice is to check fuel flow through the shutoff valve and the hose before you pull the carburetor again.
When the carb does need a deep clean, owners get good results from a soak. One Moto-4 200 owner who fought varnish for weeks dropped the disassembled carb into a bucket of lacquer thinner for three hours. After he blew everything out with an air hose, the engine fired on the first kick. Others use Pine-Sol for a gentler overnight soak. Take the o-rings out before any solvent goes near it, and be patient with the tiny brass passages, because the pilot circuit clogs first and hides its blockage well. On the Mikuni VM22SH used on the 200, the stock settings are easy to mix up once the adjusters move, so write them down: 115 main jet with the needle on clip three for the 52H-00 version, pilot screw 1.5 turns out.
No spark, no start: tracing the electrical system
The ignition and charging layout on these quads is simple compared with anything modern, which makes it easy to test in order. The system is made up of a starter, a starter relay, a CDI box, a rectifier-regulator, plus an ignition coil. The CDI does double duty as the electronic ignition and the ignition advance, and the rectifier-regulator takes the AC output from the stator, converts it to DC, then holds the charging voltage around 14.5 volts.
When a Moto-4 cranks but will not fire, the fastest test is a couple of shots of starting fluid into the airbox. If it lights briefly, the problem is fuel. If it does not light at all, you have no spark. A 1989 Moto-4 250 that would not fire even when pulled down a hill worked through this ladder: every part on the cranking side tested fine, the carb had been rebuilt, yet the machine still would not catch. The culprit was fuel after all. The float-bowl vent was clogged, so the bowl never filled and the engine starved. Once the vent was clear, it fired right up.
On the spark side, the usual suspects are the coil, the pickup, or the CDI box. Owners report that a stator can go weak after decades of use, which shows up as a battery that slowly dies instead of a hard no-start. Because the regulator holds the system near 14.5 volts, a voltmeter check at the battery with the engine running tells you quickly whether the charging side is alive. Clean and tighten every ground connection first. These machines spend their lives bouncing through dust and mud, and a corroded ground causes more intermittent faults than any electronic part.
The starter clutch free-spins behind the flywheel
On the 350 models, the starter clutch sits on the crankshaft behind the flywheel. Owners who have been there describe the symptom exactly: the starter motor spins but the engine does not turn over, so there is no crank action at all. Pulling the flywheel is the only way in, and that takes a flywheel puller with the right bolts. It is exactly what one Moto-4 350 owner was hunting for when he asked which bolts to use for pulling the flywheel so he could reach the starter clutch.
This is the same one-way clutch arrangement Yamaha used across its ATV range of that era, and it fails the same way: it lets the starter spin freely instead of grabbing the crank. Before you tear into it, rule out the easy stuff. A tired battery can make the starter turn slowly enough that it sounds like a free-spinning clutch, so charge and load-test the battery first. When the diagnosis is real, replacement starter clutches are still sold for these engines. The job is a weekend project with a flywheel puller, a torque wrench, plus a service manual. This is one repair where the aftermarket supply is good, because the same part family fed several Yamaha models.
The sub-transmission: high, low, and reverse
The larger Moto-4s shift twice. A foot lever works through the main gears, and a second lever on the left side of the engine selects high, low, or reverse. That second lever runs the sub-transmission, and it is the source of most of the confusion new owners hit. In a help-ID thread where a Moto-4 rolled freely in every gear and would not move under power, the first advice was to make sure the sub-transmission was actually in gear, then to check the clutch pack behind the right-side cover. The unit had a driveshaft u-joint under a rubber boot, and watching whether that shaft turned with the engine was the quick way to confirm the failure was upstream in the clutch or gearbox.
The sub-transmission also explains a quirk that surprises new owners: you can shift the foot lever through every gear and still be in neutral for driving if the sub-transmission lever is sitting between positions. Owners describe it as a lever that feels sloppy after years of use, and the fix usually starts with cleaning and lubricating the linkage and confirming the detents are worn. If the lever will not stay put, worn detent springs and the shift fork mechanism are the next suspects. That means splitting the case, which is the point where most owners call in help.
Gearboxes that slip or pop out of gear
Once the sub-transmission is understood, the complaints that show up next are gearboxes that slip, pop out of gear, or take their time engaging. A rider on an 86 Moto-4 225 described the transmission slipping and the shift lever popping back into neutral for a few seconds before crunching into gear, and the first thing to check in that situation is the oil level. On these machines the engine and transmission share the same oil, and low oil makes the transmission slip before any other symptom appears.
If the gearbox starts acting up, drain the oil and inspect it for metal before you pull the engine apart. A little gray sludge is normal clutch wear, but chunks and glitter point to gears and shafts, which is a different budget entirely. Oil changes fix a surprising number of these complaints, because the wet clutch and the transmission both depend on fresh oil doing its job. On shaft-drive models, pull back the rubber boot on the driveshaft with the engine idling; if the u-joint is not turning while the engine runs, the failure is inside, in the clutch or the gearbox, not in the final drive.
Clutch behavior on the semi-automatic gearboxes
The Moto-4 range uses semi-automatic gearboxes with an automatic clutch, which is why there is no clutch lever to pull. Wikipedia’s transmission overview lists the whole Moto-4 range alongside other auto-clutch Yamahas. The clutch pack lives behind the right-side engine cover, and it is a wet clutch, which means it shares the engine oil and wears gradually rather than suddenly.
Owners report a machine that creeps at idle when the clutch drags and engages abruptly in high range; shift quality depends heavily on oil condition. If the clutch slips under load, the first suspect is the oil, not the plates. If it drags, check idle speed and make sure the machine is not just idling too fast. The sub-transmission lever and the foot shifter work together, and owners who learn the two-lever rhythm early avoid a lot of false diagnoses. On chain-drive models, the drive chain is a wear item that gets neglected because it sits buried under the plastics, so adjust and lube it with every oil change. Shaft-drive models trade chain maintenance for u-joint and boot checks; the little 80cc Moto-4 was shaft driven with a four-speed auto-clutch gearbox.
What to check before buying a used Moto-4
Condition beats price on these machines, because a full rebuild can cost more than the quad itself. Start by identifying the model. The engine size is cast into the cylinder and the model code is on the frame; the sub-transmission lever tells you whether the unit has high and low range, which the larger models got. The badge number is only nominal: the 225 models used a 223cc engine, while the 250s that followed used a 229cc motor, both air-cooled singles. The 200 ran from the mid-1980s through 1989 with a shaft-drive version badged YFM200DX, and the 350 models carried the top displacement in the line. Parts support is one of the Moto-4’s strengths. Mikuni jets and gaskets are still made, and so are clutch plates and starter clutches, plus cheap used parts machines show up on the classifieds when one finally dies.
Test the fuel system cold and hot. Does it start without choke once warm? Does the pilot circuit hold an idle? Bring a fresh battery and confirm the starter engages without free-spinning, then shift through every gear, including reverse and both sub-transmission ranges, while rolling the machine. Check the oil: a low level or dark, metallic oil is a red flag, because the transmission shares it. Look at the drive chain or the shaft boots, and pull the seat to check for mouse nests and rust in the airbox, both common on machines that have spent a decade in a shed. If you would rather compare against something far newer, the Can-Am Outlander 450 is a different era of machine entirely. If a vintage sport quad is the goal, the Polaris Predator 500 has its own era-specific issues to learn.
Maintenance that keeps a Moto-4 alive
These engines are nearly indestructible when they get regular oil changes, and neglect kills more of them than wear. The YFM225 manual calls for 2.2 quarts of 10W-30 or 10W-40 depending on temperature, and the oil filter on that model is a screen inside the case that you remove, clean, then reinstall rather than replace, according to an owner quoting the factory manual.
Fuel is the second killer. Modern pump gas with ethanol gums up these carbs faster than the fuel they were designed for, and the varnish forms exactly where it hurts, in the pilot circuit. Drain the float bowl if the machine will sit for more than a few weeks, add fuel stabilizer, then run the engine long enough to pull stabilized fuel through the system. If a machine comes out of storage and only runs on choke, that is the pilot circuit talking; clean it before you adjust anything else. Owners who wrench on these singles also check valve clearance when a Moto-4 will not start or run right, so keep that on the list for a machine that has sat.
Keep the air filter clean, because these engines live in dust. Check the drive chain or shaft boots with every oil change. Modern Yamaha quads such as the Wolverine X4 are far more complex machines, which is one reason people hold onto their Moto-4s. If you ever move up to a newer utility quad, the Grizzly 700 has its own list of modern problems to know before you buy. On the budget side, the CFMoto Uforce 1000 shows how far the class has come. But for a simple, air-cooled four-stroke you can fix with hand tools, the Moto-4 is still hard to beat.
Bottom line: the Yamaha Moto-4 is one of the most fixable vintage ATVs you can buy, and almost every common failure is a fuel, electrical, or oil problem rather than a mechanical catastrophe. A carburetor that needs a deep clean, a no-start from a clogged vent or a weak stator, a starter clutch behind the flywheel, a sub-transmission that slips on low oil: all of these are jobs a home mechanic can handle with hand tools and a manual. If you buy one, budget for a carb service and fresh fluids before you trust it; keep the fuel fresh. Do that, and a Moto-4 from 1986 will keep working the way it did then. And if you find a Yamaha side-by-side is more your speed instead, the Rhino 450 has its own trouble spots to read up on before you commit.
If you’re ordering supplies, synthetic ATV oil and oil filter are the items owners reach for first when they start working on these machines.

